- About MAA
- Membership
- MAA Publications
- Periodicals
- Blogs
- MAA Book Series
- MAA Press (an imprint of the AMS)
- MAA Notes
- MAA Reviews
- Mathematical Communication
- Information for Libraries
- Author Resources
- Advertise with MAA
- Meetings
- Competitions
- Programs
- Communities
- MAA Sections
- SIGMAA
- MAA Connect
- Students
- MAA Awards
- Awards Booklets
- Writing Awards
- Teaching Awards
- Service Awards
- Research Awards
- Lecture Awards
- Putnam Competition Individual and Team Winners
- D. E. Shaw Group AMC 8 Awards & Certificates
- Maryam Mirzakhani AMC 10 A Awards & Certificates
- Two Sigma AMC 10 B Awards & Certificates
- Jane Street AMC 12 A Awards & Certificates
- Akamai AMC 12 B Awards & Certificates
- High School Teachers
- News
You are here
Teaching Leonardo: An Integrated Approach - Tiling a Floor Using Geometer's Sketchpad

INSTRUCTIONS FOR PERSPECTIVE DRAWING OF
TILE FLOOR USING GEOMETER’S SKETCHPAD
1. Place and label point A near bottom of screen.
2. Place and label point C along horizontal line also near bottom of screen, several inches away from A.
3. Construct line segment AC.
4. Construct midpoint of segment AC.
5. Label the midpoint B.
6. Construct the midpoint of segment AB and label it D. To do this you will have to select points A and B and construct the segment AB. This will appear on top of the segment already constructed. Then you can select that segment and construct its midpoint.
7. Construct the midpoint of segment BC (as in step 6) and label it E.
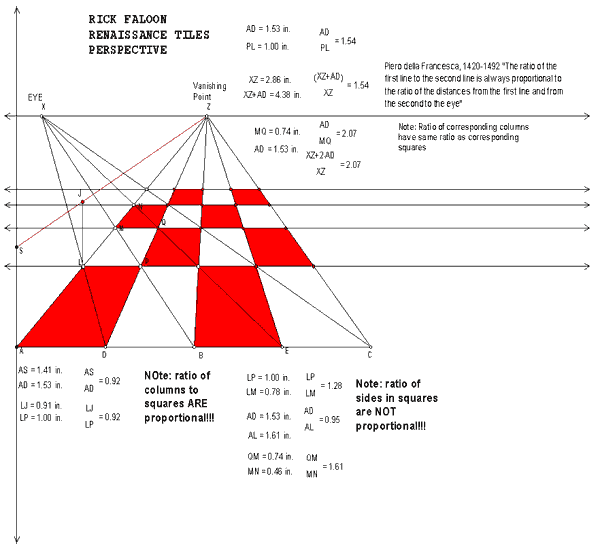
8. Place and label point Z several inches above AC and approximately over the point B.
9. Construct segments AZ, BZ, CZ, DZ, and EZ.
10. Construct a line through Z parallel to AC.
11. On new line constructed in step 10 above construct and label point X to the left and several inches away.
12. Construct DX.
13. Construct the point of intersection of AZ and DX and label the point L .
14. Construct BX.
15. Construct the point of intersection of AZ and BX and label the point M.
16. Construct EX.
17. Construct the point of intersection of AZ and EX and label the point N .
18. Construct ray through L and parallel to AC. Note that this line goes through the intersection point of DZ and BX. Construct that intersection point and label it P .
19. Construct ray through M parallel to AC. Note that this line goes through the intersection point of EX and DZ. Construct that intersection point and label it Q .
20. Construct ray through N and parallel to AC .
21. (Optional: You may “clean up” the drawing or skip this step.) Select and undo the construction lines DL, MB and EN. Color in “tiles” to make drawing appear more like a tile floor, by constructing the polygon interior and selecting a color from the display menu.
22. Optional: You may want to construct columns at the edge of your tile floor. To do this, construct a line segment at A perpendicular to AC. Make this line segment a bit longer than AD. Label the upper endpoint of this line segment S and construct SZ. Then construct line segments from L, M, N each perpendicular to AC and ending on the line segment SZ. These constructions will take some thought, because you will probably have to construct certain lines and later delete certain parts of the line. Think carefully about how to do this.
23. a) Label the vanishing point.
b) Label the horizon line.
c) Measure the length XZ. This is the viewing distance of the painting.
d) Measure the line segments to find the ratios of PL to AD and of
XZ to (XZ+AD)
24. The Renaissance artist/mathematian Piero della Francesca (1420-1492) said that “the ratio of the first line to the second line is always proportional to the ratio of the distances from the eye to the first line and from the second to the eye.” Copy and paste this quotation onto your drawing and measure the following lengths to show that these ratios are the same: MQ to AD; XZ to (XZ+2AD).
25. If you have constructed the columns in step 22, find the ratio of the length of the second column to the first (AS). Show that this ratio is the same as that of PL to AD. Similarly, find the ratio of the length of the third column to the first and show that it is the same as that of MQ to AD.
Rick Faloon (The Ross School), "Teaching Leonardo: An Integrated Approach - Tiling a Floor Using Geometer's Sketchpad," Convergence (June 2010), DOI:10.4169/loci002172


